Iguana – My Profile
1 Introduction
1.1 Overview
“My Profile” is Iguana's user profile application. It allows users to view their personal settings, preferences, interests and history. The My Profile features are grouped in a number of areas. These are among others:
· Logon
· Current (and past) circulation data
· Personal user data (name, address, …)
· Linked accounts
· Interests
· Reading Lists
· Reservations
· Enrol
After log on the user will see any messages from the Vubis application (such as ‘reservation available') on the Welcome screen.
1.2 Settings for My Profile
The set-up of the My Profile page is done via Parameters – Parameter setup – User activities. Please see the document on Parameters for more information.
1.3 Logon and pending link requests
The logon application allows the user to enter his credentials and log on to Iguana. The logon application can be either a popup or can be inserted into a page. It typically consists of two text fields that need to be filled in: the user's actual (barcode) number and his “password”, which can be a PIN code, his birthday or some other mechanism. Which fields actually appear in the form depend on settings in the WebOpac Preferences.
It is also possible to allow the user to log on with email address (the application will resolve the potential conflict between card number and email address- - if the input contains a (@) it will be treated as an email address, in all other cases as a card number); via the eID card (Belgian identification method); or via Single SignON access (supported are: Aselect and CWIPS).
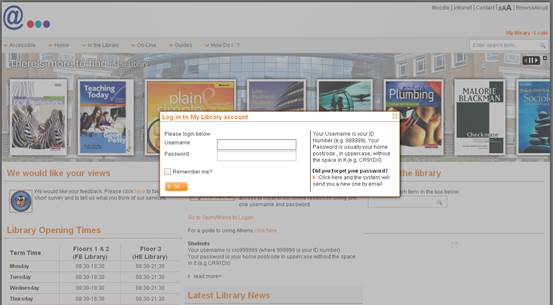
The screen shot shows an example logon form. It was activated when the user clicked on the “My library / Login” link in the right bottom corner of the header.
After a successful logon, the user is referred to his My Profile start page.
In some cases, a user is not referred directly to his My Profile start page, but an intermediate “Link request” message is displayed. This popup message appears when there is a link request from another user account pending. This means that another user has asked permission for access to the account. The user that has logged on can now accept or refuse the request. This popup is only activated when there are pending requests.
1.4 My Profile start page
The My Profile start page consists of four applications:
· Overview and Navigation: the menu list of available My Profile option, which is a combination of user summary data (number of current loans, current reservations and payments due) and a list of hyperlinks to the main My Profile applications
· Welcome: an application containing an introduction for the user; this application is opened by default when the My Profile page is activated
· Personal user data: this is a display only application that shows some key user date (name, address, …) and gives access to the Edit personal user data application
· Linked accounts: a list of linked accounts and the ability to request a link to a new user, switch to a linked account and remove a link to another account.
These four applications are typically displayed in a two column structure, in which the Welcome applications is placed in a column and the other applications in the other column. The (left or right) location of these columns is flexible.
The My Profile page is usually complemented with an animation that shows new items in the library but that takes into account the user's personal interests. Or in other words: the animation will display new items based on the user's interests.
|
|
Obviously, it is not mandatory to include an animation on the My Profile page, nor is it to reflect the user's interests. However, it is very logical to do so, as this is yet another step in the personalisation of the user's My Profile page. |
1.5 My Profile applications
My Profile supports the following applications:
· Current loans: list of current loans (“items at home”), including the ability to renew one, all or some of the loans (*)
· Current reservations: list of current reservations, including the ability to cancel reservations and change the expiry date or the pickup location (*)
· Loan history: list of items the user ever loaned, including the ability to remove items from the list and set the visibility for other users (*)
· Outstanding payments: list of payments due (*)
· Payments history: list of payments (*)
· Deposits overview: list of the user's deposits (*)
· Loan plan widget: summary of the “loan plan” information and a list of documents on loan based on a “loan plan” (*)
· Search preferences & options: this option allows the user to define so-called search preferences; these preferences are then automatically applied as restrictions when the user searches in the collection; typical search preferences include material types, languages, databases, and others; if a user includes in his search preferences e.g. a preference for French as a language, that user will be presented works in French only; obviously, the user can then overrule this setting during the search process (*)
· Interests: list of the user's interests; add an interest, remove an interest, indicate whether the user wants to receive a personalized email based on his interest profile
· Reading lists
· Change personal data: view, add or edit user data (**)
· Linked accounts
The applications marked with (*) are not further discussed in this documentation. They are all related to the current or past circulation actions of the user.
The Change personal data application shows a short overview of the user's personal data (name, address) and gives access to a page where the user can change his personal data. You have full control over which data elements (fields) can be changed by the user. This is, again, controlled via the WebOpac Preferences.
The other applications, Interests, Reading Lists and Linked accounts, are discussed in upcoming sections of this chapter.
1.6 Personal data
You can allow users to view their personal data and even let them update information. What is offered in this section is governed by the settings in Parameters – Parameter setup – User activities.
Note
This does not include the option to select a Contact Method.
1.6.1 How are multiple email addresses handled?
It is possible to allow a user to have more than one email address. Iguana deals with these in the following way:
· When registering as New borrower, the confirmation is sent to both email addresses
· When the user changes his/her personal data online, the confirmation is sent to both email addresses
· For all other functions (such as confirmation for renewal of items on loan), email defaults to first email address only and you cannot add any others
2 Interests
Iguana supports a feature called “Interests”, which allows a user to indicate his topics of interest. Once registered, Iguana will offer all sorts of personalized services to the user, such as personalized animations, automated personalized emails, personalized “selected for you” pages and others. These features are described in the document on Interests. That document also contains information on how to create, manage, import and process interest topics.
Please note that there are in fact two types of interests:
· a set of predefined interest topics, which are generic and defined by the library
· the user can however also create his own “ad-hoc” interest topics; this is done as part of the search process: while searching the user can store in his Interest profile any search term (including restrictions).
2.1 Overview of Interests on the My Profile page
If the user selects the “Interests” option from the Overview & Navigation application on the My Profile start page, he will get access to his personal Interests page. This page contains the following components:
· an introductory text
· a list of the user's current Interest topics; you can remove topics from this list by clicking on the icon (![]() )
)
you need to hover the mouse to the left of the topic for the delete icon to appear
· a link that gives access to all possible predefined topics
· an (optional) A-Z list, which gives access to the list of predefined topics, ordered per letter (based on the topic's name) (e.g. “M” shows “Management”, “Marketing”, “Mechanics”, etc.)
· a choice (checkbox) to indicate whether or not the user wants to receive personalized emails based on his personal interests
· a link to a personalized “Selected for you” page, i.e. a link to a page that gives access to all recently acquired works that correspond to the user's interest topics.
Note
It is not possible to remove a system defined interest topic from your personal Interests.
2.2 Automatic creation of Interest profiles
Iguana supports the automatic creation of Interest profiles for individual users. For users who (1) do not have an interest profile defined and (2) do have a loan history, an interest profile can be created automatically. If this feature is active, the user will be prompted with a question if Iguana should automatically create an interest profile based on the loan history. This option is shown when the user navigates to his personal Interest page.
Iguana will show the most relevant “proposed” Interest topics from the list of predefined Interest topics and allow the user to indicate which of these proposed topics should be included in his personal Interest profile.
2.3 Configuration
The configuration of the Interest topics is described in detail in the document on Interests.
You can define all screen texts via Iguana CMS > General & Tools > System texts > filter the display on “Module Contains interest”.

The texts that are related to Interests will be displayed and you can modify them if required.
You can control the presence (or absence) of the abovementioned A-Z list on the Interest page via: Iguana CMS > Parameters > Parameter setup > User Activities > Interests: Show alphabetical selection of interest topics.
You can activate the automatic creation of an Interest topic profile via: Iguana CMS > Parameters > Parameter setup > User Activities > Interests: Propose to create interests profile.
3 Reading Lists
Reading Lists are temporary "containers" that hold references to documents. These can be documents in the local bibliographic database(s) or URL's.
The documents that are stored in a Reading List have the following properties:
· They can have a specific comment (i.e. a comment specific in the context of the Reading List).
· They can have a specific "reading advice".
The comments and reading advice that are added in the Reading List are specific to the Reading List (e.g. the same document can have the reading advice "Background reading" in Reading List A and the reading advice "Essential reading" in Reading List B). The comments and reading advice are not displayed in the standard search display, but only in the context of the Reading List.
They can both be updated from the Reading List display.
Reading Lists can be of the following types:
· Private: only the creator has read/write access to the list
· Personal: the creator has read/write access, others have read access
· Shared: everyone has read/write access to the list
· Shared protected: everyone has read/write access to the list but a user can only delete items that (s)he has added personally.
3.1 Using Reading Lists
3.1.1 Reading Lists overview page
If the user is not logged on, one can select the Reading List from a dropdown list.
If the user is logged on, (s)he can:
· create a new Reading List
· create a new URL that can be added afterwards to a Reading List
· delete a Reading List.
If a Reading List is selected, the Reading List details screen is shown.
3.1.2 Reading List details page
The Reading Lists details screen is very similar to a "normal" result set display in Iguana.
Comment and rating can be updated if the user has write access for the Reading List.
3.1.3 Adding records to and removing them from a Reading List
Database records can be added by selecting items and using the "Store selected items in reading list" option (which is displayed in the option pane on the Search result set page).
URL records can also be created and added to a reading list. This is done from the reading lists overview screen.
Obviously, records can also be removed from a Reading List.
It is possible to select a default list on the search results screen. When a document is added to a reading list this default list will be used automatically.
It is possible to copy the contents of a temporary list (created before logon) to a private list (after logon).
There are Select all / Deselect all buttons available to facilitate copying the entire contents of a list to another list.
3.2 Set-up
Some setup is done via Parameters – Parameter setup – Search – Reading lists.
The rest of the setup is done via the Iguana CMS under Reading lists, consult the document General & Tools for more information.
4 Linked accounts
Linked accounts is an Iguana feature that facilitates easy access to accounts for users who are related to each other one way or another and who allow access to their account. Examples are e.g. a parent who has access to the accounts of his/her children, or a customer who has multiple memberships (and who can link from one account to the other).
If customer accounts are linked, customer A can see the account of customer B. The linking can be reciprocal, but this is optional.
The Linked account application has the following content:
· top text
· list of Linked accounts and their status (the statuses can be “Waits for approval” or “Refused”, - if a link request is accepted, the status is not mentioned, i.e. accounts that are linked have no visible status indication)
· a hyperlink to create a new Linked account
· bottom text.
The top and bottom texts can be used to explain the concept of Linked accounts to the user.
4.1 Linking accounts
The principle behind Linking accounts is that one “requests” another user for his or her agreement to the linking. Only if the “other” user accepts the link request will it be created. A user who has accepted a link request can at all times revoke (i.e. undo) the link.
Accounts can be linked as follows.
1. Click on the link in the Linked accounts application.
2. A popup form will appear and you will be asked to fill in the card id (number) of the user to whose account you want to have access. Check the User can also view my account checkbox if you also allow the other user access to your account.
3. Click on the button to submit the form.
4. The first part of the process is now completed. The user will be included in the list of Linked accounts and will get the status “Waits for approval”.
The process needs to be concluded by the “other” user.
5. When the user to whom the link request was directed logs on the next time, he will be asked to accept the request. If he does so, the link is established.
Obviously, in some cases, such as a parent/child relationship, it is the requesting user who also finishes the process by logging in (once) with the credentials of the “other” user.
4.2 Display of Linked accounts
Linked accounts are displayed as part of the Linked accounts application. For each Linked account the name of the linked user and the link status are displayed.
If the user hovers his mouse over the Linked accounts application, buttons will appear behind each user, which can be used to remove the link. This can be done at all times, by both users (by the “requestor” and by the linked account). The link is removed immediately.
If you click on a Linked account, the My Profile page of that user will be displayed. In such a case a new application will appear on top of the Overview & Navigation application. This application displays clearly that you are looking at somebody else's account and also contains a hyperlink to navigate back to your own account.
4.3 Configuration
You can activate or de-activate linked accounts via: Iguana CMS > Parameters > Parameter setup > User activities – General settings: select under Valid options.
You can define all screen texts via Iguana CMS > General & Tools > System texts > filter the display on “Module Contains related”.

The texts that are related to Linked accounts will be displayed and you can modify them if required.
5 Reservations
The My Profile functionality supports Reservations, i.e. the ability to place a reservation on a work from the local collection. The exact functionality is determined by the setup in the CMS parameters.
The setup is done in the CMS via Parameters – Parameter setup – Search – Reservations and Parameters – Parameter setup – User activities – Current reservations. Please see the document on Parameters for more information.
5.1 Stack requests
When stack requests are in use it is possible to allow placement via Iguana.
From the full bib record page in the "I want to..." section the option Stack Request will be available for a record that qualifies for placing a stack request. I.e. the normal rules for whether or not placement of a stack request is allowed are applied.
In the User Activities the option "Non-catalogued stack request" will be available if the menu option is activated in the WebOpac Preferences Menu (for the Iguana profile).
When a user initiates a stack request from the "I want to..." section, the separate windows that pop up will be from the traditional WebOpac.
6 Feedback
It is possible to allow the user one or more methods to send feedback to the library.
You can define this via a Page with an application based on specific templates for this purpose. Such a page could look like this:

7 Enrol as user
Iguana supports that users enrol themselves, either as a full member or as a so-called “guest member”. Guest membership would then e.g. give access to only a limited number of services in the digital library (and not in the physical library). The workflow to enrol as "guest member" is - by design - different from the one to enrol as "full member" The idea behind this is that it is in the library's interest that as many people as possible will enrol as guest member and register. To facilitate this and to increase the likelihood of people registering, guest members will need to define only the bare minimum of information (primarily email address and password).
7.1 Enrolment functionality
The enrolment process consists of multiple steps, some of which are optional. These steps are:
1. Age (optional): the user indicates how old he is
2. Membership category/type: the user selects his preferred membership type, which maps to a borrower category (in the back-end V-smart ILS)
3. User identification: the user enters his name, address, gender and similar data; for a full membership this is determined by the WebOpac Preferences (where you can define which fields can be defined and which ones are mandatory) (see below); for a guest membership the list of fields is predefined (see below)
4. Payment (optional): the user receives information about the payment terms that are related to the chosen membership type
5. Confirmation: the user is presented a summary of the entered data and confirms; this page also contains a checkbox that the user must check to accept the “Terms and conditions”
For each step in this process, a context-sensitive help text can be defined, which is displayed at the side of the page.
The enrolment process proceeds as follows:
6. When the user confirms the enrolment, an email is sent to the email address that he has entered as part of the enrolment process.
7. The email contains a hyperlink. If the user clicks on the hyperlink, he is redirected to the last stage of the enrolment process. He is now enrolled.
8. After this the password will be created.
The above approach, forcing the user to enter a “second confirmation” by clicking on the hyperlink in the email is called “double opt-in”. Please note that the enrolment request link has a limited validity and will expire at the end of the day.
7.1.1 Storing the user / the new member
All newly registered users, full members as well as guest members, are stored in the customer database of the V-smart ILS. They can be recognized by the value of the “AddedThrough” field.
7.1.2 Guest membership
If a user enrols for guest membership the mandatory fields are:
· nickname (will be made unique if it already exists)
· email address – this will be used as the user's logon ID
· a question + answer that the user chooses for re-sending of the password by e-mail (in case the user forgets his password).
The following fields are optional:
· gender
· home address – place
· age
· receive newsletter.
|
|
Please note that Infor can modify which fields are mandatory and optional fields. |
|
|
A default borrower category, defined by the library, is assigned to each guest member record. |
After enrolment an email will be sent with a link the user must click in order to confirm activation of the account. After this the password will be created.
There is a separate change password option, this is not part of the borrower data fields.
It is possible to enforce periodic changes of the password.
7.2 Configuration
The set-up for enrolment is done via Parameters – Parameter setup – User activities - Registration. Please see the document on Parameters for more information.
As part of this setup you can define a list of “Available fields”. When enrolling a subset of these fields have to be entered by the user to define his identity (“User identification”). The list of these fields is library-defined. For the time being this list cannot be managed interactively, but is set by Infor. The list MUST be a subset of the “Available fields” definitions in the WebOpac user activities Preferences. (If any of these fields are mandatory, this must be indicated as well.)
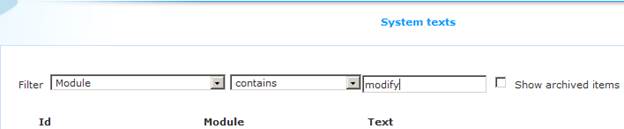
You can define all screen texts via Iguana CMS > General & Tools > System texts > filter the display on “Module Contains modify”.
The texts that are related to the enrolment process will be displayed and you can modify them if required. This includes “help texts” that you can define for each step in the enrolment process.
You can control the presence (or absence) of the two optional steps in the process: Iguana CMS > Parameters > Parameter setup > User activities – Registration: Include Age selection and Include Payment.
7.3 Example workflow
The following screen shots show an example workflow for the enrolment process.
Screen shot 1 : the customer selects the “Register now” option.

Screen shot 2 : Entry of name, address, email address, etc.

Screen shot 3 : The customer has confirmed the data he has entered in the previous steps of the process and an email is sent to the email address that he has entered.

Screen shot 4 : The customer has clicked on the hyperlink in the email, which brings him back to the website. He is now enrolled.
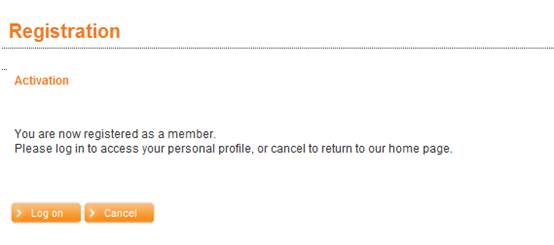
Depending on various parameter settings the new borrower may now be prompted for a new password and/or to accept the Terms & Conditions.
7.4 Enrolment & online payment
It is also possible to configure the system in such a way, that the new customer can pay the membership fee as part of online registration. See the relevant chapter in the How To … document for more information.
The steps are the same as described above. But when clicking on the activation link in the email received, the next screen is as follows:

When the borrower clicks OK, the next screen will appear:

After clicking OK to acknowledge the message, the user is taken to the actual payment screen. This is a screen from the payment provider.
Exact details will depend on the Payment Service Provider being used.
After payment is completed and return from the payment provider's page to Iguana, the regular activation message will appear – confirming payment was successful:
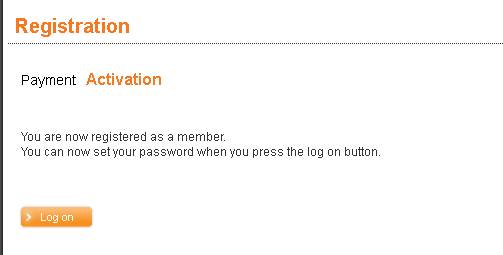
Once the further registration is completed – such as selecting a new password and/or accepting the Terms & Conditions – the new borrower can log in and find the details of the transaction in the Payment history:

8 Online payments
The link to online payments is integrated on the following places in the application:
· Payments due (on the My profile page)
· Online enrolment
· Increase deposit (on the My profile page)
The link to online payments is visually presented as a System text and can contain images of the supported payment methods.
For example:

Note
This functionality relies on the correct settings for payments and payment providers in AFO 497. Whether adding money to a deposit is allowed, relies on settings for deposit codes in AFO 481 – Deposits.
8.1 Payments due
Example of the Payments due screen:

Columns on the screen
Payment type: An indication what the payment is for.
Title: This contains the title of the item for replacement costs, fines, loan fees and reservation fees. For sales items: the number of articles sold and a description of the article. For all other types: the text "*** administration ***".
If payment for membership fee is NOT part of online registration, membership fee can also be listed here (with that wording).
Notes/Items: The date of the transaction. In some cases there will be additional info. See the help of AFO 414 for a complete list.
Amount: The amount to be paid.
Workflow
If partial payments are not allowed, there are no check boxes and the button is shown underneath the list. Otherwise a borrower can check one, more or all of the lines with outstanding amounts. Of course within the rules set by the library, such as minimum amount for payment.
Once this is done, a button will appear, .
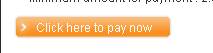
Once the borrower clicks on that, an intermediate information screen will appear:

After clicking OK to acknowledge the message, the user is taken to the actual payment screen. This is a screen from the payment provider.
Exact details will depend on the Payment Service Provider being used.
8.2 Deposits
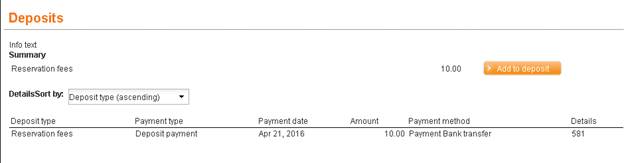
Example of the Deposit page with option to add money:
Columns on the screen
Deposit type: The wording of the deposit code as defined in AFO 481 – Deposits – Deposit codes.
Payment type: An indication what the payment is for. E.g. Deposit payment means adding funds to the deposit.
Payment date: The date of the transaction.
Amount: The amount paid. Please note this can be positive (when funds were added to the deposit) or negative (when the deposit was used for payment or a refund was done via the V-smart application).
Payment method: These are the same wordings as appear in the Transaction column of the borrower's payment history (in AFO 431). They are payment types as defined in AFO 494.
Details: This column can contain:
- for loan fees: the title
- for reservations: title information
- for payment into deposit and refunds: the borrower barcode
Workflow
A borrower can choose a deposit to add funds to.
Once this is done, a pop-up will appear where the amount to be added can be entered:
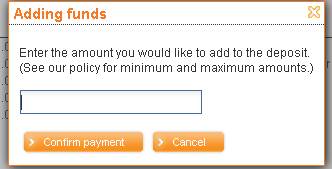
Enter the amount, of course within the rules set by the library, such as minimum/maximum amount for adding.
If the borrower does not conform to those rules, a warning will appear, for example:

After clicking , the user is taken to the actual payment screen. This is a screen from the payment provider.
Exact details will depend on the Payment Service Provider being used.
Note
When online payment is enabled, the borrower cannot choose to pay for anything from a deposit. It is only possible to top up the deposit amount online.
· Document control – Change History
|
Version |
Date |
Change description |
Author |
|
|
1.0 |
September 2011 |
Creation (skeleton structure only) |
|
|
|
1.1 |
January 2012 |
Added initial high-level information |
|
|
|
1.2 |
January 2012 |
Added header |
|
|
|
1.3 |
January 2012 |
Added additional information |
|
|
|
1.4 |
February 2012 |
Added additional information on Online enrolment (examples) |
|
|
|
1.5 |
February 2012 |
Reviewed |
|
|
|
2.0 |
May 2012 |
Reformat for online help doc |
|
|
|
3.0 |
January 2013 |
General update |
|
|
|
3.1 |
April 2014 |
Show messages; new logon methods; Deposits functionality; Copy all to reading list; Feedback |
|
|
|
3.2 |
August 2014 |
Textual improvements |
|
|
|
4.0 |
April 2016 |
Textual improvements; multiple email addresses; stack requests; online payments |
|
|